
오늘은 spring의 어노테이션 중 하나인 autowired에 대해 공부해볼까 합니다.
(저번에 포스팅한 autowire 속성과 쓰는 방법만 다르지 기능 자체는 같습니다.)
[Spring] 08. 속성 사용하기 - Autowire
오늘은 spring의 bean속성 중 autowire라는 기능에 대해 정리해보려고 합니다. 새로운 프로젝트부터 만들러 가볼까요? (프로젝트는 그냥 큰 구분을 위한 것일 뿐 굳이 새로 안 만들어도 상관없습니다.
darmk.tistory.com
바로 패키지부터 만들러 가보겠습니다.
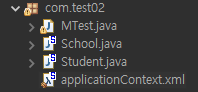
School.java
package com.test02;
import org.springframework.beans.factory.annotation.Autowired;
import org.springframework.beans.factory.annotation.Qualifier;
public class School {
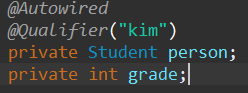
private Student person;
private int grade;
public School() {
}
public School(Student person, int grade) {
this.person = person;
this.grade = grade;
}
public Student getPerson() {
return person;
}
public void setPerson(Student person) {
this.person = person;
}
public int getGrade() {
return grade;
}
public void setGrade(int grade) {
this.grade = grade;
}
@Override
public String toString() {
return "School [person=" + person + ", grade=" + grade + "]";
}
}Student.java
package com.test02;

public class Student {

	private String name;
	private String addr;
	private String age;

	public Student() {
	}
	public Student(String name, String addr, String age) {
		this.name = name;
		this.addr = addr;
		this.age = age;
	}

	public String getName() {
		return name;
	}
	public void setName(String name) {
		this.name = name;
	}
	public String getAddr() {
		return addr;
	}
	public void setAddr(String addr) {
		this.addr = addr;
	}
	public String getAge() {
		return age;
	}
	public void setAge(String age) {
		this.age = age;
	}

	@Override
	public String toString() {
		return "Student [name=" + name + ", addr=" + addr + ", age=" + age + "]";
	}
}
MTest.java
package com.test02;

import org.springframework.context.ApplicationContext;
import org.springframework.context.support.ClassPathXmlApplicationContext;

public class MTest {

	public static void main(String[] args) {
		ApplicationContext factory = new ClassPathXmlApplicationContext("com/test02/applicationContext.xml");

		School mySchool = (School) factory.getBean("mySchool");
		System.out.println(mySchool);
	}

}
applicationContext.xml
<?xml version="1.0" encoding="UTF-8"?>
<beans xmlns="http://www.springframework.org/schema/beans"
	xmlns:xsi="http://www.w3.org/2001/XMLSchema-instance"
	xmlns:context="http://www.springframework.org/schema/context"
	xsi:schemaLocation="http://www.springframework.org/schema/beans http://www.springframework.org/schema/beans/spring-beans.xsd
		http://www.springframework.org/schema/context http://www.springframework.org/schema/context/spring-context-4.3.xsd">


	<context:annotation-config />

	<bean id="kim" class="com.test02.Student">
		<property name="name" value="김범수" />
		<property name="addr" value="서울시 강남구" />
		<property name="age" value="16" />
	</bean>

	<bean id="mySchool" class="com.test02.School">
		<property name="grade" value="3" />
	</bean>
</beans>
코드 실행결과

가장 먼저 Spring Framework에서 annotation을 사용하려면
1. CommonAnnotationBeanPostProcessor 클래스를 설정 파일에 bean객체로 등록한다.
<bean class="org.springframework.beans.factory.annotation.CommonAnnotationBeanPostProcessor" />
2. <context:annotation-config> 태그를 이용한다.
@Autowired, @Required, @Resource, @PostConstructor, @PreDestroy 등의 annotation을 자동 처리해주는 bean post processor
3. <context:component-scan base-package="" /> 태그를 이용한다.
@Component, @Controller, @Service, @Repository 등의 annotation을 자동 처리
4. <mvc:annotation-driven />
@RequestMapping, @Valid 등 spring mvc component들을 자동 처리
HandlerMapping, HandlerAdapter를 등록하여 @Controller에 요청 연결
해당 설정이 없어도 component-scan이 있으면 mvc application 동작
이렇게 4가지의 설정들을 필요로 합니다.
그래서 이번엔 applicationContext.xml을 만들때 namespace에서 context에 체크를 하고 넘겨줍니다.
그리고 "<context:annotation-config />" 이것을 꼭 써줘야 합니다!!!
이것을 써줘야만 @Autowired, @Qualifier같은 애들을 읽어서 동작시켜줍니다.
현재 코드 실행결과를 보면 객체는 생성되어 있지만 person에 값이 들어가 있지 않아 null 이 발생한 것을 볼 수 있는데요
이때 School클래스의 Student객체로 만들어진 부분에 @Autowired해주면 값이 잘 나오는 것을 볼 수 있습니다.


@Autowired는 값을 자동으로 연결해주는 애 라고 알고 계시면 됩니다.
**Autowired의 흐름을 잠깐 살펴보자면 처음에 적어줄 때 byType으로 값을 연결할 수 있는지 확인 먼저 한 후
byname으로 값을 찾아서 연결해줍니다.
따라서 @Autowired 는
<bean id="mySchool" class="com.test02.School" autowire="byType">
<property name="grade" value="3" />
</bean>
과 같습니다.
그렇다면 만약에 bean이 2개 이상일 경우는 어떻게 해야 할까요?
autowire속성을 사용한다면 에러가 발생하여 byType 이외에 다른 속성을 적어줬었습니다.
하지만 이 경우에는 @Qualifier("객체이름")을 사용하여 객체를 지정해주면 그 지정된 객체만 잡아주기 때문에 이러한 문제를 해결할 수 있습니다.
applicatonContext.xml
<?xml version="1.0" encoding="UTF-8"?>
<beans xmlns="http://www.springframework.org/schema/beans"
	xmlns:xsi="http://www.w3.org/2001/XMLSchema-instance"
	xmlns:context="http://www.springframework.org/schema/context"
	xsi:schemaLocation="http://www.springframework.org/schema/beans http://www.springframework.org/schema/beans/spring-beans.xsd
		http://www.springframework.org/schema/context http://www.springframework.org/schema/context/spring-context-4.3.xsd">


	<context:annotation-config />

	<bean id="kim" class="com.test02.Student">
		<property name="name" value="김범수" />
		<property name="addr" value="서울시 강남구" />
		<property name="age" value="16" />
	</bean>

	<bean id="park" class="com.test02.Student">
		<constructor-arg value="박효신" />
		<constructor-arg value="서울시 송파구" />
		<constructor-arg value="16" />
	</bean>


	<bean id="mySchool" class="com.test02.School">
		<property name="grade" value="3" />
	</bean>
</beans>
이렇게 kim과 park 2개로 나뉜 경우 @Autowired만 쓰면 당연히 에러가 발생하지만

이렇게 @Qualifier를 사용해서 객체를 하나만 지정해준다면
에러 없이 값이 잘 출력됩니다.

'Java > Spring' 카테고리의 다른 글
| [Spring] 12. AOP - 기본 개념 ( CC, CCC, Joinpoint, ...) (0) | 2021.07.03 |
|---|---|
| [Spring] 11. Annotation - Component (3) | 2021.06.26 |
| [Spring] 09. MessageSource (메시지 국제화) (0) | 2021.06.24 |
| [Spring] 08. <bean> 속성 사용하기 - Autowire (0) | 2021.06.23 |
| [Spring] 07. 객체의 생성 타이밍 ( + lazy-init) (0) | 2021.06.21 |